Твой садовые инструменты для уборки Это может как улучшить, так и ухудшить здоровье ваших растений. Но вот чего большинство садоводов не осознают: эти грязные, тусклые секатор Возможно, используемые вами средства приносят вашим драгоценным растениям больше вреда, чем пользы.
Подумайте об этом. Каждый порез грязными лезвиями распространяет болезни с одного растения на другое. Тупые лезвия сдавливают стебли, вместо того чтобы делать чистые срезы. И эта дорогая пара секатор для растений Вы купили их в прошлом сезоне? Если вы не будете за ними должным образом ухаживать, их придётся заменить гораздо раньше.
Это руководство покажет вам все подробно. как чистить ножницы и поддерживать их в идеально остром состоянии. Вы узнаете пошаговый процесс ухода за ними. садовые инструментыЗащитите свои растения от болезней и сэкономьте деньги, продлив срок службы ваших инструментов. Независимо от того, занимаетесь ли вы простым техническим обслуживанием или боретесь со стойкой ржавчиной, мы вам поможем.
Почему чистые садовые ножницы важны для здоровья вашего сада
Скрытые опасности грязных секаторов
Грязный секатор Они действуют как крошечные переносчики болезней в вашем саду. Каждый раз, когда вы срезаете зараженное растение и переходите к здоровому, вы потенциально распространяете бактериальные инфекции, грибковые заболевания и вирусы. Бактериальный ожог, бактериальный рак и мучнистая роса могут попасть на ваши садовые ножи.
Но передача болезней — не единственная проблема. Загрязненные лезвия быстрее затупляются, потому что на режущих кромках скапливаются сок и мусор. Это скопление заставляет вас прилагать больше усилий при резке, что может повредить как ваши растения, так и ваши руки. Дополнительное усилие также создает ненужную нагрузку на движущиеся части инструмента.
Твой секаторы для растений Они не предназначены для проталкивания липких загрязнений и ржавчины. Когда им приходится работать с большей нагрузкой, пружины изнашиваются быстрее, точки опоры ослабевают, а положение лезвий смещается. Этот каскадный эффект превращает простую проблему технического обслуживания в дорогостоящую проблему замены.
Преимущества регулярного ухода за садовым инструментом и его чистки.
Чистые садовые ножницы Срезайте точно, как при хирургическом вмешательстве, раны, которые быстро заживают и препятствуют инфицированию. Растения лучше реагируют на чистые срезы, потому что рана закрывается быстрее, и у болезнетворных организмов меньше возможностей проникнуть внутрь. Ваши розы, плодовые деревья и кустарники отблагодарят вас более здоровым ростом и обильным цветением.
При регулярном уходе производительность значительно улучшается. Острые, чистые лезвия легко скользят по веткам с минимальными усилиями. Вы заметите снижение усталости рук во время длительных сеансов обрезки. А те жесткие, одревесневшие стебли, которые раньше требовали многократной обрезки? Теперь они будут чисто срезаться одним плавным движением.
Срок службы инструмента значительно увеличивается при надлежащем уходе за оборудованием. Профессиональные ландшафтные дизайнеры часто используют такое же высококачественное оборудование. заточка садовых секаторов При надлежащем уходе — на протяжении десятилетий. Регулярная уборка Предотвращает образование ржавчины, смазка обеспечивает плавную работу движущихся частей, а правильное хранение защищает от воздействия окружающей среды.
Когда и как часто чистить секатор
График ежедневной уборки
Для профилактики заболеваний необходимо незамедлительно принимать меры при работе с зараженными растениями. Как продезинфицировать секатор Это особенно важно при переходе от больных к здоровым экземплярам. При борьбе с бактериальными или грибковыми инфекциями протирайте лезвия спиртом после каждого растения.
Уход в конце дня занимает всего пять минут, но предотвращает серьезные проблемы. Смойте водой смолу и мусор, тщательно высушите и нанесите тонкий слой масла, чтобы предотвратить образование ржавчины за ночь. Эта простая процедура сохранит ваш садовый инструмент в отличном состоянии. садовые инструменты для уборки готовы к завтрашней работе.
Но не ограничивайтесь простой чисткой. Проверьте выравнивание лезвий, протестируйте работу режущего механизма и осмотрите инструмент на наличие ранних признаков износа или повреждений. Выявление мелких проблем на ранней стадии предотвратит их превращение в серьезный ремонт в будущем.
График генеральной уборки
Ежегодную генеральную уборку следует проводить не реже одного раза в год, предпочтительно весной, до начала интенсивного вегетационного периода. Это комплексное техническое обслуживание включает в себя полную разборку, тщательное удаление ржавчины, заточку, смазку и сборку. Многие садоводы совмещают это со своими сезонная уборка сада рутина.
Осенняя уборка перед зимним хранением заслуживает особого внимания. Удалите все органические материалы, которые могут накапливать влагу и вызывать ржавчину. Нанесите защитные масляные покрытия и храните инструменты в сухом месте. Ваши инструменты будут готовы к немедленному использованию после зимнего хранения.
Обратите внимание на предупреждающие признаки, указывающие на необходимость немедленного вмешательства. Залипание лезвий, затрудненное резание, видимые пятна ржавчины или ослабленные шарниры — все это свидетельствует о том, что ваш заточка секатора График нуждается в ускорении.
Необходимые принадлежности для чистки садовых ножниц
Основные чистящие средства
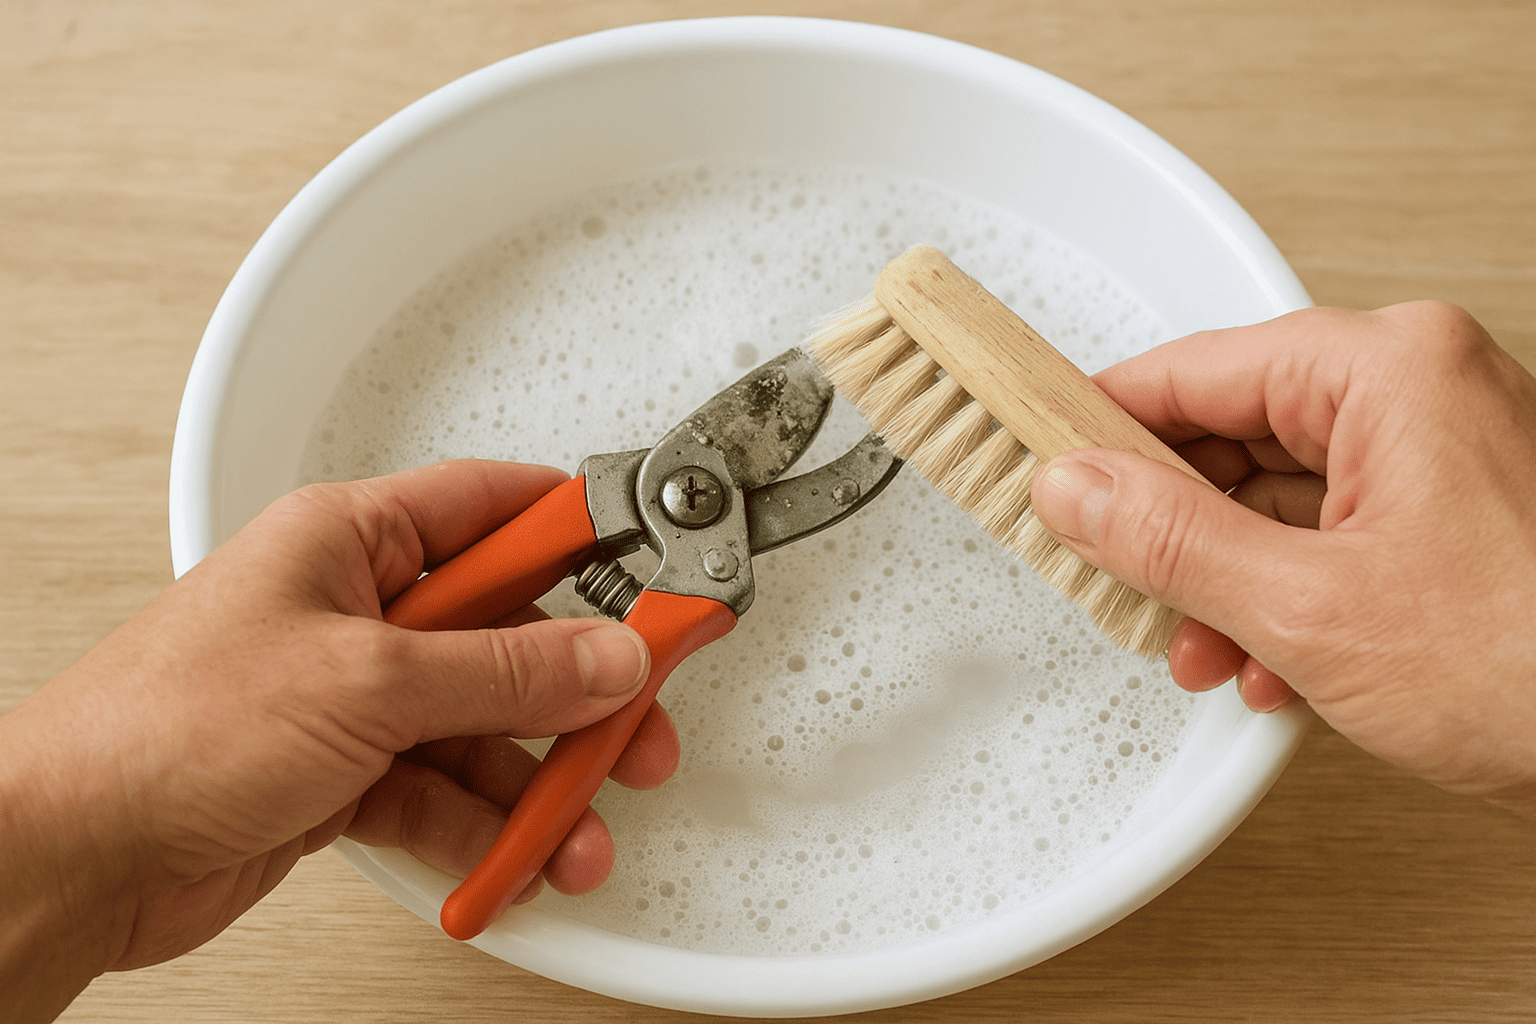
Теплая мыльная вода остается основой чистка садовых ножницИспользуйте средство для мытья посуды и... жесткая щетка Для удаления большей части грязи, смолы и органических загрязнений. Мыло расщепляет липкие остатки, а щетка обеспечивает механическое очищение, не царапая металлические поверхности.
Стальная вата и чистящие подушечки справятся со стойкими загрязнениями и легкой ржавчиной. Для деликатных поверхностей выбирайте мелкозернистую стальную вату, а для удаления сильной ржавчины — более крупнозернистую. Однако будьте осторожны при работе с движущимися частями, так как металлические частицы могут нанести ущерб.
Для сушки и окончательной полировки лучше всего подходят чистые салфетки из микрофибры. Они эффективно впитывают влагу, не оставляя ворсинок. Держите несколько таких салфеток под рукой, потому что для завершающих этапов вам понадобятся свежие, сухие салфетки.
Дезинфицирующие растворы
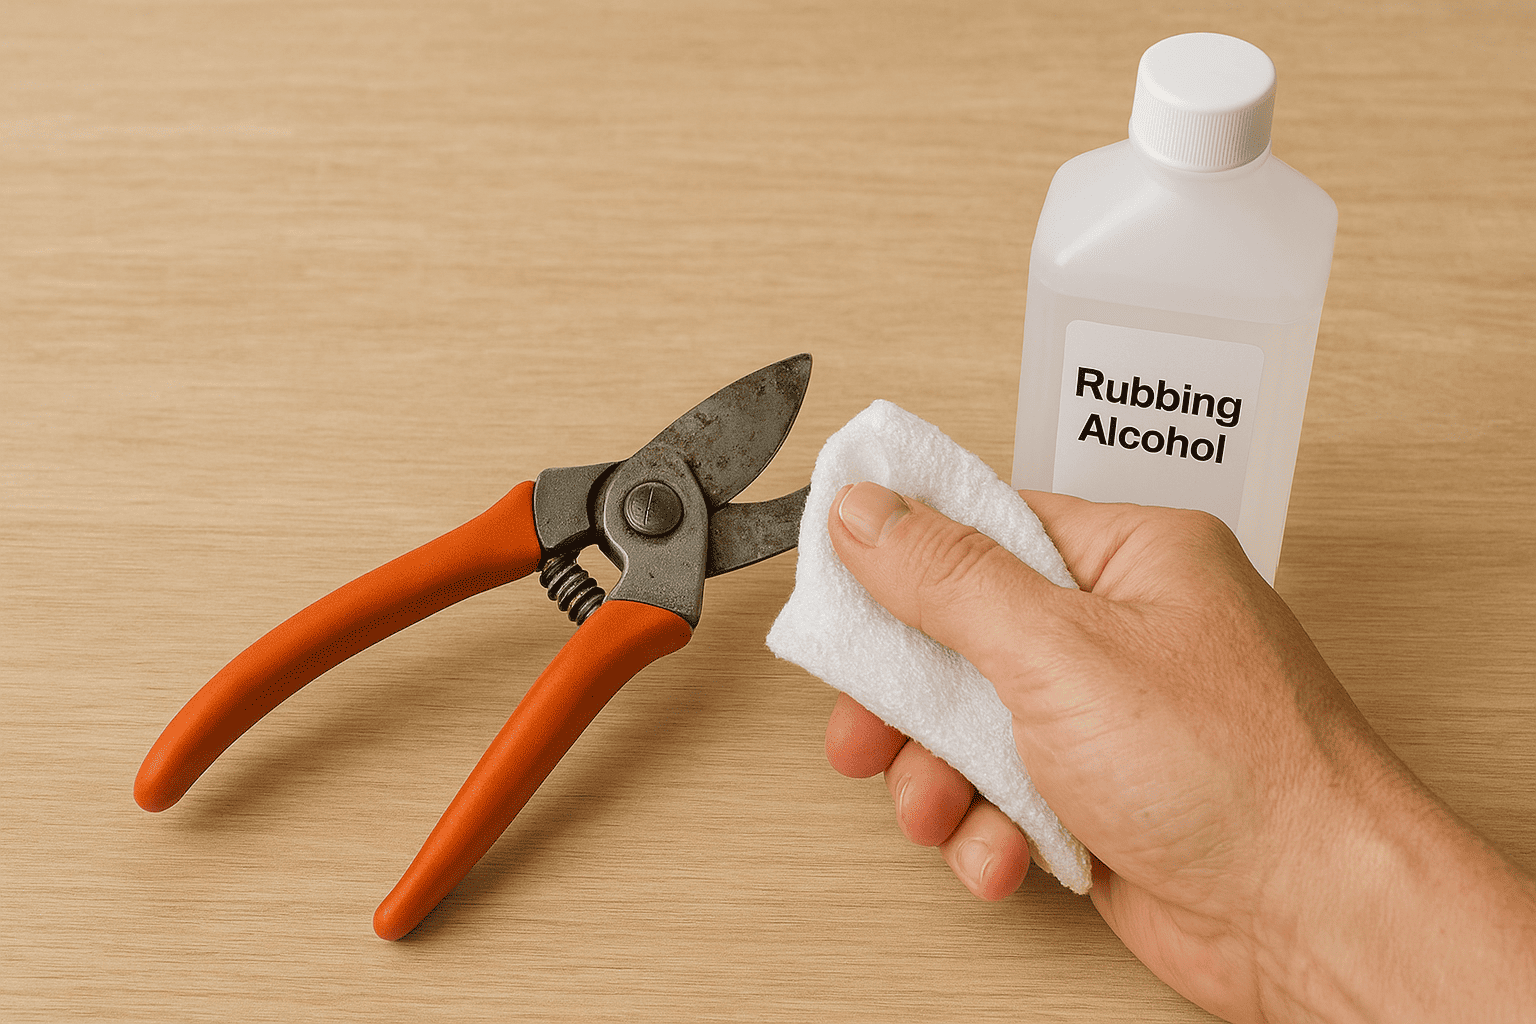
Семидесятипроцентный изопропиловый спирт обеспечивает наиболее эффективную дезинфекцию. дезинфицирующие секаторыСредство быстро испаряется, уничтожает большинство патогенных микроорганизмов и не требует смывания. Просто протрите лезвия тканью, смоченной спиртом, и вы готовы продолжить работу.
Растворы отбеливателя обеспечивают тщательную дезинфекцию при серьезных заболеваниях. Для эффективного уничтожения патогенов смешайте одну часть отбеливателя с девятью частями воды. Однако для достижения правильного эффекта отбеливателю требуется время контакта, и его необходимо смыть, чтобы предотвратить коррозию металла.
Перекись водорода хорошо подходит для замачивания сильно загрязненных инструментов. Она расщепляет органические вещества, одновременно оказывая антимикробное действие. Коммерческие дезинфицирующие средства для сада удобны в использовании, но часто содержат аналогичные активные ингредиенты в более высоких концентрациях.
Пошаговая инструкция: Как правильно чистить ножницы
Основной процесс уборки
Защитное снаряжение оберегает вас во время чистка и секатор Процесс. Надевайте перчатки, чтобы защитить руки от острых краев и чистящих средств. Защитные очки предотвратят попадание брызг раствора в глаза. Эти простые меры предосторожности предотвращают большинство травм, связанных с уборкой.
Начните с тщательного ополаскивания садовым шлангом. Это удалит рыхлую грязь, листья и мусор, которые могут поцарапать поверхности во время чистки. Обратите особое внимание на зону поворота, где обычно скапливаются органические вещества.
Удалите скопившуюся смолу и грязь, используя теплую мыльную воду и жесткую щетку. Втирайте чистящий раствор во все щели и движущиеся части. Для удаления стойких отложений смолы эффективны коммерческие чистящие средства, такие как Scrubbing Bubbles, которые расщепляют липкие остатки.
Тщательно промойте чистой водой, чтобы удалить все остатки мыла. Мыло, оставшееся на металлических поверхностях, может притягивать грязь и влагу. После этого полностью высушите поверхность чистыми полотенцами или сжатым воздухом, чтобы предотвратить образование ржавчины.
Как дезинфицировать секатор
Выбирайте метод дезинфекции в зависимости от ситуации. Спирт быстро действует при обычной дезинфекции между растениями. Растворы отбеливателя обеспечивают более глубокое антимикробное действие при серьезных вспышках заболеваний. Перекись водорода предлагает промежуточный уровень эффективности с меньшим риском коррозии.
Способ применения влияет на эффективность дезинфекции. Протирание салфетками, смоченными спиртом, обеспечивает быструю дезинфекцию. Замачивание в растворе отбеливателя гарантирует полное покрытие, но требует больше времени. Распылители обеспечивают равномерное покрытие больших поверхностей инструментов.
В садовых условиях свежеприготовленный раствор отбеливателя 10 % (1 часть бытового отбеливателя на 9 частей воды) следует использовать в течение двух часов после смешивания, а инструменты следует замачивать в течение 30 минут. Для обеспечения полной дезинфекции садового оборудования и уничтожения патогенных микроорганизмов не спешите на этом этапе, поскольку недостаточное время контакта может оставить жизнеспособные патогенные микроорганизмы, сводя на нет ваши усилия по санитарной обработке. Всегда соблюдайте рекомендуемое время воздействия и поддерживайте поверхности влажными в течение всего времени перед ополаскиванием или протиркой.
Удаление ржавчины с садовых инструментов
Оценка определяет лучший способ чистки садовых инструментов Поражены ржавчиной. Легкая поверхностная ржавчина устраняется с помощью стальной ваты и ручного труда. Сильная ржавчина может потребовать химической обработки или профессиональной реставрации. Глубокие точечные повреждения могут означать, что пришло время замены.
Белый уксус обеспечивает безопасное и эффективное удаление ржавчины путем замачивания на ночь. Уксусная кислота растворяет ржавчину, бережно воздействуя на металл. Этот метод хорошо подходит для инструментов с легкой и умеренной степенью ржавчины.
WD-40 проникает в сильные ржавчины и разрыхляет стойкие отложения. Нанесите обильно и подождите десять минут, прежде чем чистить стальной ватой. Эта комбинация справляется с ржавчиной, которую один только уксус не может растворить.
Когда разбирать ножницы
Техническое обслуживание в конце сезона оправдывает полную разборку для тщательной очистки и осмотра. Такая глубокая чистка выявляет скрытые проблемы и обеспечивает доступ к обычно недоступным местам. Сделайте фотографии перед разборкой, чтобы обеспечить правильную сборку.
Сильная коррозия или механические неисправности требуют разборки для надлежащей оценки и ремонта. Иногда повреждения, которые снаружи кажутся незначительными, выявляют серьезные внутренние проблемы. Документация помогает отслеживать состояние компонентов с течением времени.
Процесс разборки
Фотосъемка документирует каждый этап разборки для точной сборки. Сделайте снимки с разных ракурсов, показывающие, как компоненты соединяются друг с другом. Эти справочные фотографии предотвратят путаницу при сборке спустя недели или месяцы.
Для снятия компонентов обычно требуется открутить гайку, которая скрепляет лезвия. Работайте медленно и следите за шайбами, пружинами и прокладками. Некоторые инструменты используют специальные крепежные элементы, для которых требуются определенные инструменты или методы.
Организованность предотвращает потерю деталей и ускоряет сборку. Разложите компоненты по порядку на полоске скотча, чтобы сохранить последовательность. При необходимости пометьте мелкие детали. Для тщательного обслуживания очищайте компоненты по отдельности в мыльной воде.
Как заточить секатор: Полное руководство по заточке
Признаки того, что ваши секаторы нуждаются в заточке.
Эффективность резки постепенно снижается, поэтому легко пропустить признаки этого. заточка секатора Это стало необходимым. Обратите внимание на усилие, необходимое для резки. Острые лезвия разрезают ветки с минимальным усилием, в то время как тупые лезвия требуют значительного усилия.
Качество резки наглядно демонстрирует остроту лезвия. Острота секатор для растений Заточите лезвия, чтобы срезы были чистыми и быстро заживали. Тупые лезвия раздавливают стебли, образуя рваные раны, которые способствуют распространению болезней и вредителей. Если ваши срезы больше похожи на повреждение, чем на точную хирургическую операцию, пора заточить лезвия.
Необходимые инструменты для заточки садовых секаторов
Алмазные напильники обладают превосходной режущей способностью и долговечностью по сравнению с традиционными стальными напильниками. Они выпускаются с крупной, мелкой и сверхмелкой зернистостью для постепенной заточки. Крупная зернистость удаляет зазубрины и восстанавливает поврежденные кромки, а мелкая зернистость полирует режущие поверхности.
Точильные камни — это традиционные методы заточки, которые предпочитают многие профессионалы. Перед использованием камни следует замочить в воде, чтобы предотвратить попадание металлических частиц. Вода также обеспечивает смазку, которая снижает трение и нагрев во время заточки.
Твердосплавные заточные инструменты позволяют быстро подправить заточку лезвий между основными сеансами. Они удобны для обслуживания в полевых условиях, когда полная заточка нецелесообразна.
Пошаговый процесс заточки секаторов
Подготовка
Чистые садовые ножницы Тщательно заточите лезвие перед заточкой, чтобы предотвратить попадание мусора, мешающего процессу. Сок и грязь на поверхности лезвия препятствуют правильной заточке и могут привести к неравномерным результатам.
Защитное снаряжение оберегает вас во время заточка ручных секаторов Процесс. Перчатки предотвращают порезы острыми металлическими опилками, а защитные очки защищают от летящих частиц. Закрепите инструмент в тисках или зажимном устройстве для безопасной и контролируемой заточки.
Техника заточки
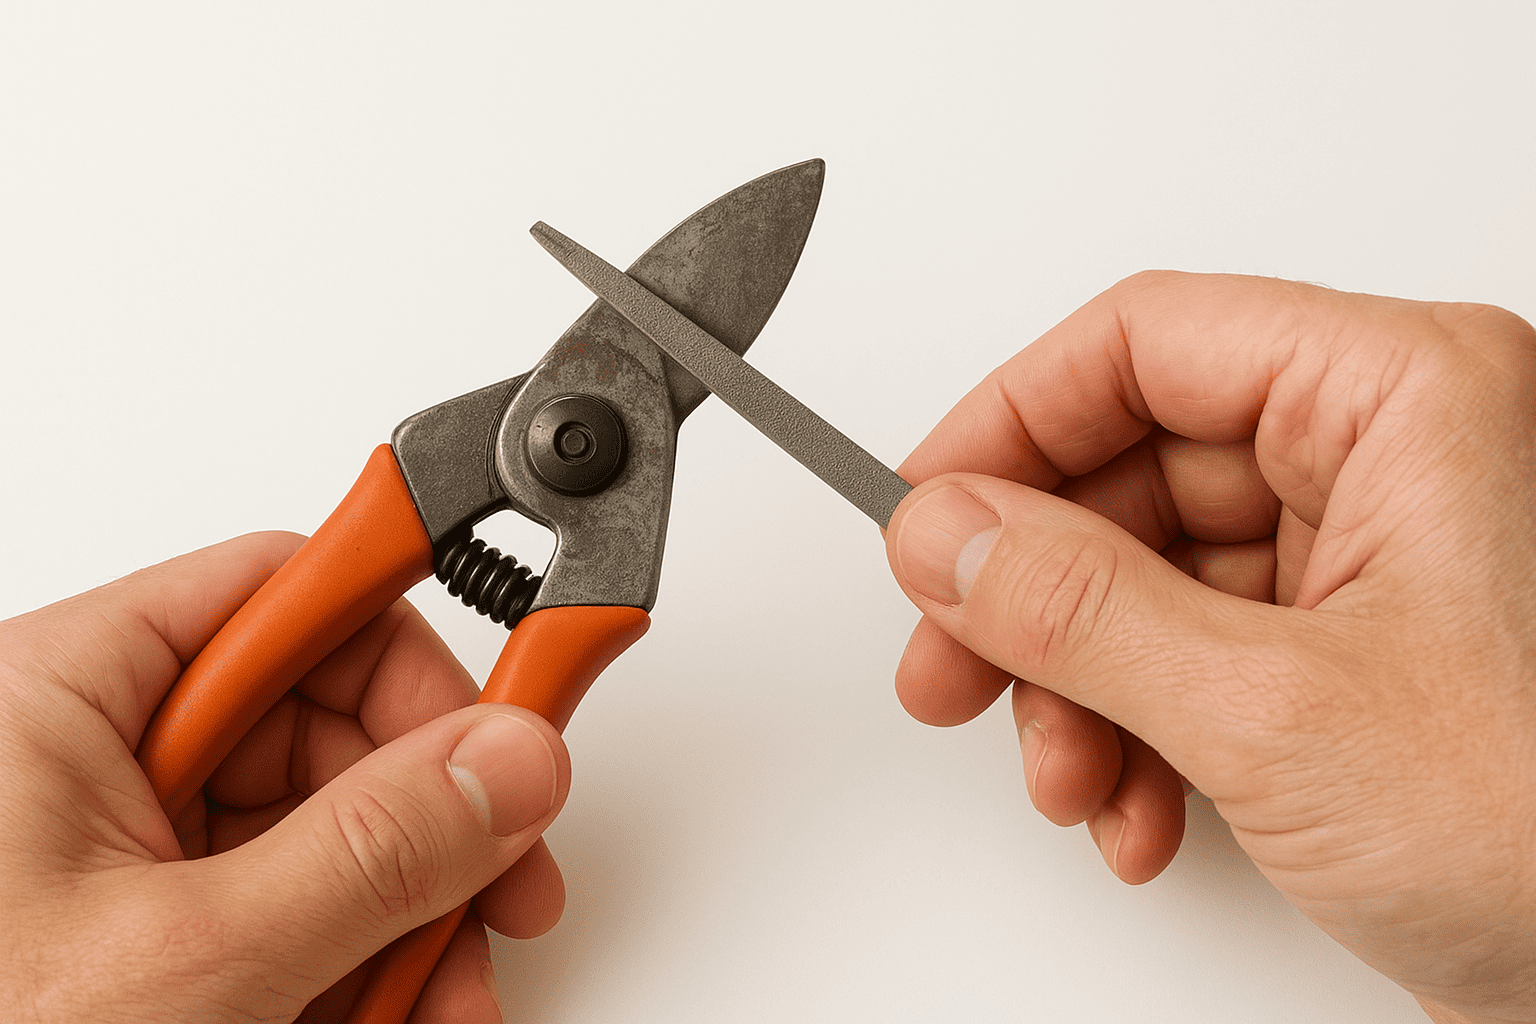
Определите заводской угол скоса, обычно он составляет около 22,5 градусов для большинства моделей. секаторЭтот исходный угол обеспечивает наилучшую производительность резки и должен сохраняться во время заточки. Изменение угла может снизить эффективность резки.
Направление заточки напильником имеет огромное значение для эффективной заточки. Всегда работайте с внутренней стороны лезвия к внешней кромке. Такое направление обеспечивает правильную геометрию режущей кромки и предотвращает образование тонкой кромки, снижающей остроту.
Последовательная зернистость позволяет добиться максимально острой кромки. Начните с крупнозернистых напильников для удаления зазубрин и восстановления поврежденных участков. Перейдите к мелкозернистым для полировки и финишной обработки. Каждая зернистость удаляет царапины, оставленные предыдущей.
Удаление заусенцев завершает процесс заточки. В результате обработки напильником на задней кромке лезвия образуются крошечные металлические завитки. Удалите эти заусенцы тонким напильником или точильным камнем, аккуратно работая по плоской задней поверхности.
Проверка остроты
Тесты на резку бумаги позволяют мгновенно оценить эффективность заточки. Острые лезвия чисто разрезают бумагу, не разрывая ее и не требуя пилящих движений. Если лезвие застревает или рвет бумагу, необходима дополнительная заточка.
Реальные испытания на небольших ветках подтверждают эффективность резки. Острый. секаторы для растений Должен распиливать сырую древесину с минимальным усилием, оставляя чистые и точные срезы.
Заточка ручных секаторов в сравнении с другими садовыми инструментами
Объезд секатор Для заточки таких инструментов требуются иные методы, чем для инструментов с наковальней. На секаторах с обводным лезвием затачивайте только режущую кромку – опорная пластина должна оставаться плоской. Заточка обеих поверхностей изменяет геометрию режущей кромки и снижает производительность.
Секаторы и кусторезы используют схожие методы, но в зависимости от конструкции могут требовать разных углов или подходов. В инструментах для тяжелых условий эксплуатации часто используются более крутые углы заточки лезвий для повышения долговечности за счет некоторой потери точности резки.
Надлежащая смазка и окончательная сборка.
Лучшие масла для садовых инструментов
WD-40 и масло 3-в-1 хорошо подходят для движущихся частей и шарнирных соединений. Эти проникающие масла вытесняют влагу, обеспечивая при этом постоянную смазку и защиту. Наносите экономно, чтобы предотвратить притягивание грязи и образование грязных отложений.
Масло Camellia обеспечивает превосходную защиту от ржавчины и обладает отличными смазывающими свойствами. Это традиционное инструментальное масло глубоко проникает в материал и обеспечивает длительную защиту, не притягивая грязь. Оно идеально подходит для инструментов, хранящихся во влажных условиях.
Варёное льняное масло хорошо подходит для деревянных ручек и обеспечивает некоторую защиту от металла. Однако следует избегать продуктов на нефтяной основе, если инструменты будут контактировать с почвой, поскольку они могут нанести вред полезным почвенным организмам.
Сборка и тестирование
Перед сборкой нанесите смазку на все движущиеся части. Несколько капель на шарнирные соединения и пружинные механизмы обеспечат плавную работу и предотвратят преждевременный износ. Удалите излишки смазки, чтобы предотвратить скопление грязи.
Аккуратно соберите всё обратно, используя фотографии-образцы, чтобы убедиться в правильном расположении компонентов. Плотно затяните крепежные элементы, но избегайте чрезмерного затягивания, так как это может повредить резьбу или ограничить движение.
Функциональное тестирование подтверждает правильность сборки и регулировки. Убедитесь, что лезвия правильно выровнены, пружины возвращают компоненты в исходное положение, а процесс резки плавный и контролируемый.
График сезонной уборки и ухода за садом
| Расписание сезона | Задачи |
| Весенняя подготовка | • Ежегодный осмотр и дезинфекция инструментов • Заточка перед периодом интенсивного роста • Выполнение технического обслуживания и замены |
| Уход в течение вегетационного периода | • Еженедельная проверка и уборка инструментов (для профессионалов) • Заточка каждые 6 недель (для пользователей, интенсивно использующих инструмент). • Протоколы профилактики заболеваний |
| Подготовка к осеннему хранению | • Тщательная очистка перед зимним хранением • Полное удаление ржавчины и обработка маслом • Обработка поверхности шлифовальным и кондиционирующим составом |
Правильное хранение садовых инструментов для уборки
Оптимальные условия хранения
Сухие, хорошо проветриваемые места хранения предотвращают накопление влаги, которое приводит к ржавчине и разрушению. Избегайте сырых подвалов, неотапливаемых гаражей с проблемами конденсации и хранения на открытом воздухе, где инструменты подвергаются воздействию экстремальных погодных условий.
Подвесные системы хранения защищают режущие кромки и предотвращают повреждения от контакта с другими инструментами. Настенные стеллажи и перфорированные панели позволяют упорядочить инструменты, обеспечивая при этом легкий доступ к ним для повседневного использования.
Для хранения мелких инструментов лучше всего подходят специальные решения. Ведра, наполненные песком, обеспечивают защитное хранение и помогают поддерживать остроту кромок благодаря легкому абразивному воздействию при установке и извлечении инструментов.
Организационные системы
Стеллажи для инструментов и перфорированные панели создают организованное хранение, ускоряя выбор инструментов и способствуя формированию правильных навыков обслуживания. Когда у инструментов есть свои места, пропавшие или поврежденные предметы становятся очевидными сразу же.
Отдельные отсеки для хранения предотвращают повреждение инструментов друг друга во время хранения. Защитные кожухи для лезвий, чехлы и отдельные отсеки защищают режущие кромки и предотвращают несчастные случаи при извлечении инструментов.
Системы маркировки и учета помогают отслеживать состояние инструментов и графики технического обслуживания. Простые бирки с указанием даты последней заточки или необходимости технического обслуживания помогают ничего не упустить.
Устранение распространенных проблем
Постоянные проблемы с ржавчиной
Когда стандартные методы оказываются неэффективными, необходимы передовые технологии удаления ржавчины. Электролитическое удаление ржавчины, использование специального клея и профессиональные реставрационные услуги могут спасти сильно поврежденные инструменты, которые в противном случае потребовали бы замены.
Решение о замене или реставрации зависит от качества инструмента, стоимости замены и сентиментальной ценности. Высококачественные инструменты часто оправдывают масштабную реставрацию, в то время как замена дешевых инструментов может быть более экономичной.
Стратегии профилактики сосредоточены на контроле влажности, защитных покрытиях и правильном хранении. Регулярный осмотр и незамедлительное устранение ранних стадий образования ржавчины предотвращают превращение мелких проблем в крупные проекты по восстановлению.
Задачи повышения точности
Поврежденные и зазубренные лезвия требуют тщательной оценки перед заточкой. Небольшие зазубрины можно удалить путем последовательной обработки напильником, в то время как серьезные повреждения могут потребовать профессиональной шлифовки или замены лезвия.
Поддержание правильного угла становится сложной задачей на сильно изношенных инструментах, где первоначальная фаска утрачена. Используйте угловые направляющие или профессиональные услуги для восстановления правильной геометрии резки.
Профессиональная заточка инструментов решает проблемы, выходящие за рамки возможностей обычного домашнего мастера. Сложный ремонт лезвий, точное восстановление угла заточки и специализированное обслуживание инструментов часто требуют профессионального оборудования и опыта.
Механические проблемы
Регулировка зазора между лезвиями влияет на качество резки и безопасность инструмента. Правильная настройка зазора обеспечивает чистый срез, предотвращая заклинивание лезвий или чрезмерную неплотность, которая снижает контроль над процессом резки.
Замена пружины решает проблему, связанную с тем, что инструменты больше не возвращаются в исходное положение после резки. Изношенные пружины влияют на процесс резки и могут привести к усталости пользователя и ухудшению качества резки.
Варианты ремонта рукояток варьируются от простой замены до полной перестройки рукоятки. Трещины или повреждения рукояток создают опасность и требуют немедленного устранения.
Заключение
Регулярное техническое обслуживание вашего секатор Превращает их из простых инструментов в высокоточные приспособления, защищающие здоровье вашего сада. Время, вложенное в чистка садовых ножниц А поддержание их в остром состоянии приносит свои плоды: улучшается здоровье растений, снижается передача болезней и продлевается срок службы инструментов.
Очистите секатор Создавайте точные срезы, которые помогают растениям быстро заживать и противостоять инфекциям. Острые лезвия уменьшают вашу рабочую нагрузку и улучшают результаты. А правильный уход значительно продлевает срок службы инструмента, делая качественные инструменты разумной долгосрочной инвестицией.
Начните внедрять эти процедуры по уходу уже сегодня. Ваши растения отреагируют более здоровым ростом, а ваши инструменты будут надежно служить вам долгие сезоны. Разница между ухоженным и запущенным садом очевидна. сад инструменты для чистки Это становится очевидным, как только вы сами убедитесь в превосходных результатах, которые обеспечивает надлежащий уход.